This article illustrates the following vc+++ concepts:
- Running applications in the System Tray.
- The use of timers.
- Resizing Dialogs.
- Changing the background color and font of a dialog.
- Saving and reading settings to and from the Registry.
- Google Coding.
Most doctors will tell you that it is terrible for your eyes to stare at a computer screen all day. They tell you to take breaks every 15 to 20 minutes (Follow the 20-20-20 rule i.e. Every 20 minutes look at an object at least 20 feet away for 20 seconds). The problem with this is that when you're busy working on a problem, its quite difficult to remember to look away from the screen every 20 minutes. That's why we end up getting
CVS, not to mention
RSI and all those other TLA's.
So what we really need is a reminder to popup on our screens every once in a while reminding us to take a break. Theres plenty of software available that already does this I'm sure. Stuff like Micropause etc. is available for download but sometimes its fun to roll your own.
The following code has been executed in Visual C++ .Net 2003 but should work fine in VC++ 6.0 as well.
So lets get started.
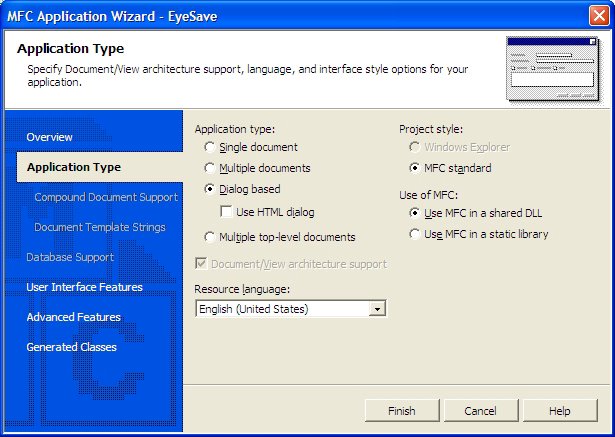
First off start a new VC++ MFC Application Project. Name it EyeSave.

Set Application Type to Dialog Based (see figure) and click on Finish.
Visual Studio should generate the classes CEyeSaveApp and CEyeSaveDlg for you.
Since this app is designed to be unobtrusive most of the time (when its not popping up reminders that is) we'd like to run it in the system tray.
A quick search of google or
codeguru will give you several ready made classes to use to do this. This also brings me to the concept of google coding, where it's always always more efficient to just search for examples on the net rather than coding them yourselves. After all there is absolutely no point in reinventing the wheel, especially when ready made classes are available just a quick google search away.
I'm using one called CTrayIcon which is shown below:-
CTrayIcon.h
#ifndef __CTrayIcon__
#define __CTrayIcon__
///////////////////////////////////////////////////////////////////////////////
// CTrayIcon - class to wrap an interface around a system tray icon
// copied almost verbatim from MSDN
class CTrayIcon : public CCmdTarget
{
protected:
DECLARE_DYNAMIC(CTrayIcon)
protected:
NOTIFYICONDATA m_iconNotification;
public:
CTrayIcon(UINT uID);
~CTrayIcon();
void SetNotificationWnd(CWnd *pNotifyWnd, UINT uCbMsg);
BOOL SetIcon(UINT uID);
BOOL SetIcon(HICON hicon, LPCSTR lpTip);
BOOL SetIcon(LPCTSTR lpszResource, LPCSTR lpszTip);
BOOL SetStandardIcon(LPCTSTR lpszResource, LPCSTR lpszTip);
virtual LRESULT OnTrayNotification(WPARAM uID, LPARAM lEvent);
};
#endif
TrayIcon.cpp
#include "StdAfx.h"
#include "TrayIcon.h"
#include "afxpriv.h"
IMPLEMENT_DYNAMIC(CTrayIcon, CCmdTarget)
CTrayIcon::CTrayIcon(UINT uID)
{
// clear the icon notification object
memset(&m_iconNotification, 0, sizeof(m_iconNotification));
m_iconNotification.cbSize = sizeof(m_iconNotification);
// set the id of the icon
m_iconNotification.uID = uID;
// load the tooltip string
AfxLoadString(uID, m_iconNotification.szTip,
sizeof(m_iconNotification.szTip));
}
CTrayIcon::~CTrayIcon()
{
// if there is an icon
if (m_iconNotification.hIcon)
{
// remove the icon from the tray
SetIcon(0);
}
}
void CTrayIcon::SetNotificationWnd(CWnd* pNotifyWnd, UINT uCbMsg)
{
// the notification window had better exist
ASSERT(pNotifyWnd==NULL || ::IsWindow(pNotifyWnd->GetSafeHwnd()));
// set the notification window
m_iconNotification.hWnd = pNotifyWnd->GetSafeHwnd();
// the callback message should either be zero or above the user group
ASSERT(uCbMsg == 0 || uCbMsg >= WM_USER);
// remember the callback message id
m_iconNotification.uCallbackMessage = uCbMsg;
}
BOOL CTrayIcon::SetIcon(UINT uID)
{
HICON hIcon; // icon handle
// assume error
hIcon = NULL;
// if there is an icon id
if (uID)
{
// load the icon tooltip
AfxLoadString(uID, m_iconNotification.szTip,
sizeof(m_iconNotification.szTip));
// load the icon
hIcon = AfxGetApp()->LoadIcon(uID);
}
// set the icon
return SetIcon(hIcon, NULL);
}
BOOL CTrayIcon::SetIcon(HICON hIcon, LPCSTR lpTip)
{
UINT msg; // type of message to send
BOOL bSuccess; // indicates success
// assume failure
bSuccess = FALSE;
// clear the message notification flags
msg = 0;
m_iconNotification.uFlags = 0;
// if there is an icon handle
if (hIcon)
{
// assume that we'll be adding the icon to the tray
msg = NIM_ADD;
// if the icon is already in the tray
if (m_iconNotification.hIcon)
{
// indicate that we're modifying the icon
msg = NIM_MODIFY;
}
// set the new icon and indicate that the icon is valid
m_iconNotification.hIcon = hIcon;
m_iconNotification.uFlags |= NIF_ICON;
}
// else we're removing the icon from the tray
else
{
// if the icon is currently in the tray
if (m_iconNotification.hIcon)
{
// prepare the message for deleting the icon
msg = NIM_DELETE;
}
}
// if there is a tooltip
if (lpTip)
{
// copy the tip to the notification object
strncpy(m_iconNotification.szTip, lpTip,
sizeof(m_iconNotification.szTip));
}
// if the tooltip is valid
if (m_iconNotification.szTip[0])
{
// indicate that the tooltip text is valid
m_iconNotification.uFlags |= NIF_TIP;
}
// if we have any callback information
if (m_iconNotification.uCallbackMessage && m_iconNotification.hWnd)
{
// prepare the callback messge flag
m_iconNotification.uFlags |= NIF_MESSAGE;
}
// if we're deleting the icon or we can't notify the shell icon
bSuccess = Shell_NotifyIcon(msg, &m_iconNotification);
if (!bSuccess || msg == NIM_DELETE)
{
// clear the icon handle
m_iconNotification.hIcon = NULL;
}
return bSuccess;
}
LRESULT CTrayIcon::OnTrayNotification(WPARAM wID, LPARAM lEvent)
{
// if the message was intended for our icon
if (wID == m_iconNotification.uID)
{
// handle according to event
switch (lEvent)
{
case WM_RBUTTONUP:
{
CMenu menu; // context menu
CMenu *pPopup; // popup menu
CPoint ptMouse; // location of the mouse
// if we can load a context menu with our icon id
if (menu.LoadMenu(m_iconNotification.uID))
{
// if we can cast the first popup menu
if ((pPopup = menu.GetSubMenu(0)) != NULL)
{
// Make first menu item the default (bold font)
::SetMenuDefaultItem(pPopup->m_hMenu, 0, TRUE);
// pick up the location of the mouse
GetCursorPos(&ptMouse);
// set the notification window as the foreground
::SetForegroundWindow(m_iconNotification.hWnd);
// track the popup menu
pPopup->TrackPopupMenu(TPM_LEFTBUTTON |
TPM_RIGHTBUTTON, ptMouse.x, ptMouse.y,
CWnd::FromHandle(m_iconNotification.hWnd));
}
}
}
break;
case WM_LBUTTONDBLCLK:
{
CMenu menu; // context menu
CMenu *pPopup; // popup menu
// if we can load a context menu with our icon id
if (menu.LoadMenu(m_iconNotification.uID))
{
// if we can cast the first popup menu
if ((pPopup = menu.GetSubMenu(0)) != NULL)
{
// perform the action of the first command
::SendMessage(m_iconNotification.hWnd,
WM_COMMAND, pPopup->GetMenuItemID(0), 0);
}
}
}
break;
default:
{
// ignore
TRACE("CTrayIcon::OnTrayNotification ignoring message %ld\n",
lEvent);
}
break;
}
}
return 1;
}
BOOL CTrayIcon::SetIcon(LPCTSTR lpszResource, LPCSTR lpszTip)
{
// set the icon resource and tooltip
return SetIcon(lpszResource ?
AfxGetApp()->LoadIcon(lpszResource) : NULL, lpszTip);
}
BOOL CTrayIcon::SetStandardIcon(LPCTSTR lpszResource, LPCSTR lpszTip)
{
// set the icon resource and tooltip
return SetIcon(::LoadIcon(NULL, lpszResource), lpszTip);
}
Once you've added these 2 files to the EyeSave Project, open up EyeSaveDlg.h and include the CTrayIcon Header file. You'll also need to declare a Message. So add the following 2 lines
#include "TrayIcon.h"
#define WM_MY_TRAY_NOTIFICATION WM_USER+1225
Now add a member variable for the CTrayIcon class
protected:
CTrayIcon m_TrayIcon;
Open up EyeSaveDlg.cpp.
You'll need to initialise m_TrayIcon in the constructor
CEyeSaveDlg::CEyeSaveDlg(CWnd* pParent /*=NULL*/)
: CDialog(CEyeSaveDlg::IDD, pParent)
,m_TrayIcon(IDR_MAINFRAME)
Now add the Functions for OnCreate and OnDestroy (Using Classwizard in VC++6.0 and the Properties->Messages Tab in VS .Net)
In OnCreate add
m_TrayIcon.SetNotificationWnd(this,WM_MY_TRAY_NOTIFICATION);
m_TrayIcon.SetIcon(MAKEINTRESOURCE(IDR_MAINFRAME),
_T("EyeSaver"));
In OnDestroy add
m_TrayIcon.SetIcon(0);
Now go to the Message Map and add
ON_MESSAGE(WM_MY_TRAY_NOTIFICATION,OnTrayNotification)
Declare the function OnTrayNotification in EyeSaveDlg.h and add the function below to EyeSaveDlg.cpp
LRESULT CEyeSaveDlg::OnTrayNotification(WPARAM wParam, LPARAM lParam)
{
return m_TrayIcon.OnTrayNotification(wParam,lParam);
}
If you compile and run this app now, you should see an Icon appear in the System Tray.
You'll also see a the EyeSaver Dialog, Since we are not planning on actually using this dialog we should hide it. We can do this by adding a call to ShowWindow in the OnPaint function.
ShowWindow(SW_HIDE);
Just displaying a system tray icon isn't much use though. We need to add a menu to this.
Go to the resource editor and Do an Add Resource->Menu
Set the Menus ID to IDR_MAINFRAME (We need to set it to the same id as the ICON used for the Systray Icon.
Add a root item called _popup_, then add 2 subitems called Settings and Exit as Shown in the figure.

Add Handlers functions Exit() and DisplaySettings() for both these menu items to the CEyeSaveDlg class.
Leave the DisplaySettings functions as it is for now.
The Exit() function should exit the application so enter in the code below:-
void CEyeSaveDlg::Exit()
{
// TODO: Add your command handler code here
OnOK();
}
We now need 2 more dialogs, one for settings and for for the actual reminder screen.
Instead of a reminder screen, we could also have the option of simply blanking or switching off the monitor.
Switching off the monitor can be done by using the following command
//To Switch off
SendMessage(WM_SYSCOMMAND,SC_MONITORPOWER,1);
//To Wake up - Should be placed in OnMouseMove
SendMessage(WM_SYSCOMMAND,SC_MONITORPOWER,-1);
I prefer showing a reminder message to simply switching off the screen though.
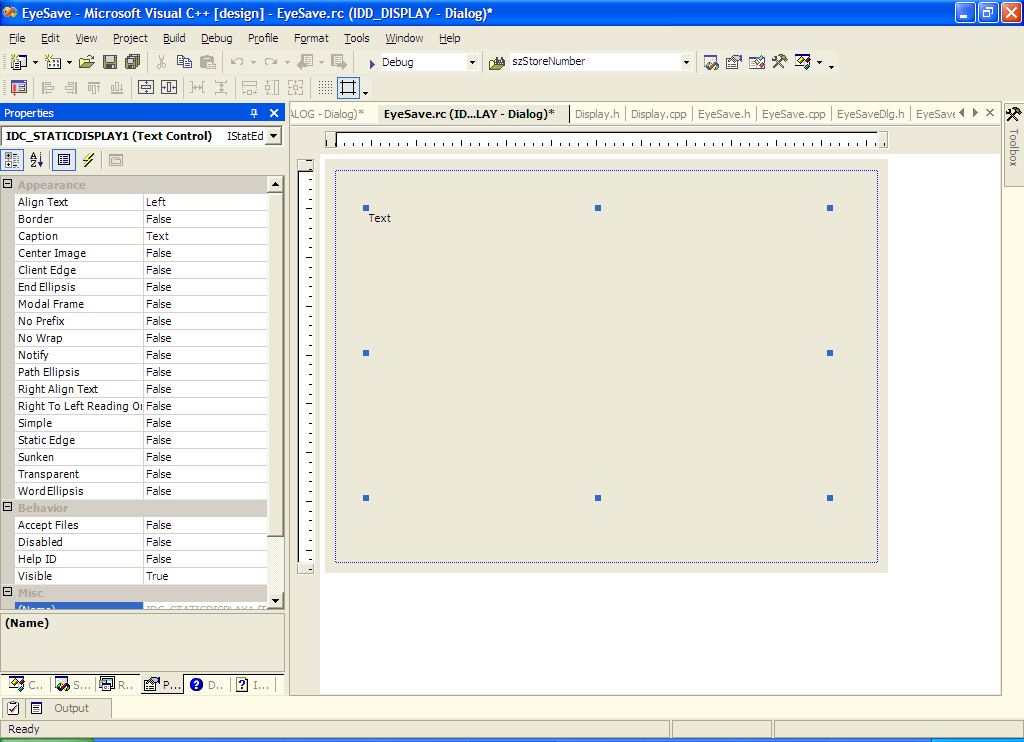
So go to the resource editor and add a dialog, then do the following
- Give it an Id of IDD_DISPLAY
- Set Border=None
- Set System Modal=True (this will make sure that the dialog will be on top of all the other dialogs)
- Add a static text control, call it IDC_STATICDISPLAY
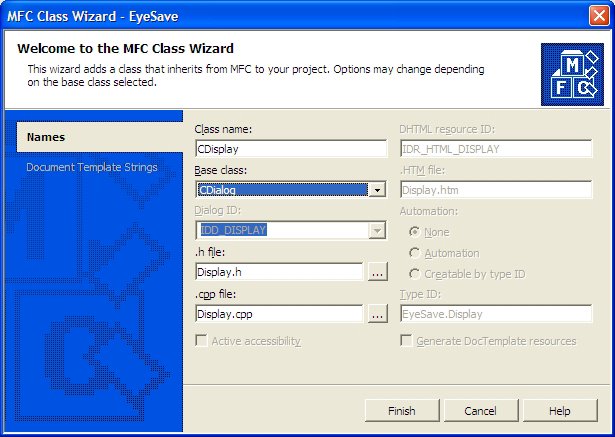
- Generate a class for this, call it CDisplay, Visual Studio should generate Display.h and Display.cpp for you


In Display.h add the following 2 member variables:-
private:
CBrush m_brush;
public:
CString m_DisplayText;
We will use CBrush to change the background colour of our dialog, m_DisplayText will be used to hold the string to be displayed in the Static Text control.
Now what I'd like for the reminder is that I should get a blank screen with the reminder displayed on it in big blue letters. If I resize the CDisplay dialog to cover the whole screen and set its background color to black I should get what I need. I'll also need to reset the font and color of the IDC_STATICDISPLAY text control.
So in Init Dialog I'll add the following
BOOL CDisplay::OnInitDialog()
{
CDialog::OnInitDialog();
// TODO: Add extra initialization here
m_brush.CreateSolidBrush(RGB(0, 0, 0));//Black Brush
//Create Font
CFont *pfont=new CFont;
pfont->CreatePointFont(400,"Verdana");
GetDlgItem(IDC_STATICDISPLAY)->SetFont(pfont,TRUE);
//SetFont(&font,TRUE);
SetDlgItemText(IDC_STATICDISPLAY,m_DisplayText);
ShowWindow(SW_MAXIMIZE);
return TRUE; // return TRUE unless you set the focus to a control
// EXCEPTION: OCX Property Pages should return FALSE
}
I've created a Black solid brush. I've aalso se the font of the static display to 40 point Verdana. Finally I call a ShowWindow to maximize the dialog.
To set the screen colors I need to override the WM_CTLCOLOR message and add the function OnCtlColor(). Add the function using the properties tab -> Messages and enter in the following:-
HBRUSH CDisplay::OnCtlColor(CDC* pDC, CWnd* pWnd, UINT nCtlColor)
{
HBRUSH hbr = CDialog::OnCtlColor(pDC, pWnd, nCtlColor);
// TODO: Change any attributes of the DC here
// TODO: Return a different brush if the default is not desired
//return hbr;
COLORREF TextColor;
TextColor = RGB(0,0,200);
//Get COntrol ID of pWnd
int nCtrlID=pWnd->GetDlgCtrlID();
if(nCtlColor == CTLCOLOR_STATIC)
{
if (nCtrlID == IDC_STATICDISPLAY)
{
// Set the text color to red
pDC->SetTextColor(TextColor);
// Set the background mode for text to transparent
// so background will show thru.
pDC->SetBkMode(TRANSPARENT);
}
}
return m_brush;
}
We just need to add a few more things now:-
An Interface to set the Display Text. Declare and add the following function:-
void CDisplay::setDisplayText(CString sText)
{
m_DisplayText=sText;
}
Don't forget to decllare this in Display.h as well.
Also we need to close the dialog when the user clicks on it. We could simply add a close button, but I prefer letting the user click anywhere on the Dialog to close it.
So Override the WM_LBUTTONUP message (From Properties Tab, click on the messages button, scroll down to the message you ant to override and click in the column next to it. You should have already done this for the OnCtlColor function).
void CDisplay::OnLButtonUp(UINT nFlags, CPoint point)
{
// TODO: Add your message handler code here and/or call default
OnOK();
CDialog::OnLButtonUp(nFlags, point);
}
If you run this now, you'll notice that th text displayed is not centered on the screen. To Do this we need to add some resizing code. You may want to play around with the code below to center perfectly, but I've found the proportions below work well enough. Override the WM_SIZE message and put in the following code:-
void CDisplay::OnSize(UINT nType, int cx, int cy)
{
CDialog::OnSize(nType, cx, cy);
// TODO: Add your message handler code here
if(nType==2 && cx>0 && cy>0)
{
GetDlgItem(IDC_STATICDISPLAY)->MoveWindow(cx/3,cy/3,cx/2,cy/2);
}
}
That's it for this Dialog. Now if you remember our original idea was to display this every 20 minutes. So go back to the CEyeSaveDlg class. We're going to add a timer to this class and using it display our CDisplay Dialog every 20 minutes.
First in EyeSaveDlg.h declare the following variables
private:
UINT_PTR m_Timer;
int m_DelaySecs;
CString m_DisplayMessage;
BOOL m_DisplayOn;
If you're using VC++ 6.0 use a UINT instead of a UINT_PTR for the m_Timer variable.
Your OnInitDialog() method for this class should already have been generated, look for the comment saying
// TODO: Add extra initialization here and add the following
// TODO: Add extra initialization here
m_DisplayMessage=AfxGetApp()->GetProfileString("EyeSaverSettings","DisplayMessage","Blink Now");
m_DelaySecs= AfxGetApp()->GetProfileInt("EyeSaverSettings","Interval",20) * 60 *1000;
m_Timer=SetTimer(1, m_DelaySecs, 0);
The GetProfileString and GetProfileInt functions read the values stored for DisplayMessage and Interval from the registry. We need to use AfxGetApp to get a pointer to the CWinApp instance as these are actuaklly CWinApp functions. Since we haven't actually saved them in the Registry yet(we'll do that in the settings dialog) the defaults of "Blink Now" and 20 minutes will be used. (For Testing this app, instead of 20 set it to 1.
We're saving the Interval in minutes but our SetTimer function takes microseconds, so we multiply Interval by 60 and 1000 to get the number of microseconds and save that in the m_DelaySecs variable.
Finally we need to override the WM_TIMER method and add the OnTimer function as below:-
void CEyeSaveDlg::OnTimer(UINT nIDEvent)
{
// TODO: Add your message handler code here and/or call default
if(!m_DisplayOn)
{
m_DisplayOn=TRUE;
CDisplay dlg;
dlg.setDisplayText(m_DisplayMessage);
dlg.DoModal();
m_DisplayOn=FALSE;
}
CDialog::OnTimer(nIDEvent);
}
m_DisplayOn should be set to FALSE in the class constructor. Once we display the dialog, we set it to TRUE, this is to insure that we don't keep popping up multiple copies of the CDisplay Dialog. We set the display text and call DoModal, resetting the m_DisplayOn to FALSE once control returns from the CDisplay dialog.
If you compile and run the application now, you should get a reminder message popping up on your screen every 20 minutes (or every 1 minute if you set the default to that)
The last thing we need to do in our app is to make it configurable, the user should be able to change the Interval settings and set the displayed text to a message of their choosing.
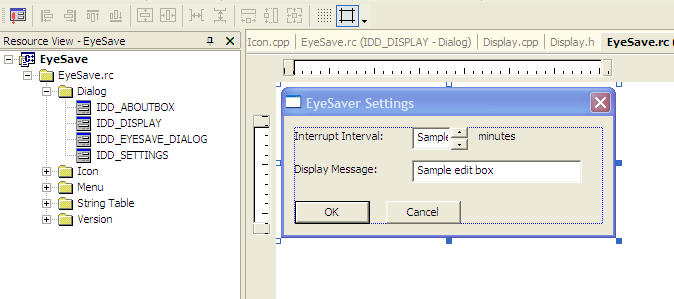
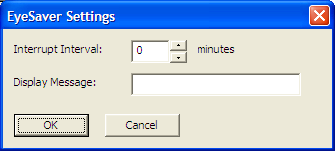
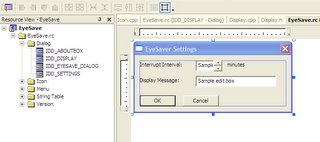
Go to the resource manager and add another dialog. Set its ID to IDD_SETTINGS and generate the CSettings class for it. You should now have Settings.h and settings.cpp in your project. Design the Dialog as shown in the figure.
- Set the caption to "EyeSaver Settings".
- Add one Edit control, and one spin control for the Interval.
- Add another Edit control for the display Message. Associate a CString Variable called m_message with this.

Set the Properties for the spin control:-
- Set AutoBuddy=True
- Set "Set Buddy Integer" = True
Add a CSpinButtonControl Variable called m_Spin for the Spin Control (Right Click Spin Control and select Add Variable)
Override the OnInitDialog function and enter in the following code:-
BOOL CSettings::OnInitDialog()
{
CDialog::OnInitDialog();
// TODO: Add extra initialization here
m_Spin.SetRange(1,180);
m_Spin.SetBuddy(GetDlgItem(IDC_EDT_INTERVAL));
//Read Values from Registry
m_Message=AfxGetApp()->GetProfileString("EyeSaverSettings","DisplayMessage","Blink Now");
m_Spin.SetPos( AfxGetApp()->GetProfileInt("EyeSaverSettings","Interval",20));
SetDlgItemText(IDC_EDT_MESSAGE,m_Message);
return TRUE; // return TRUE unless you set the focus to a control
// EXCEPTION: OCX Property Pages should return FALSE
}
In this we set the Range of the Spin control from 1 to 180. Just in case the Auto Buddy does not work correctly we also explicitly set the Buddy to IDC_EDT_INTERVAL, which was the ID we assigned to the Edit control for the interval.
Finally we retrieve the Interval and Display message from the registry using GetProfileInt and GetProfileString functions. The Parameters to these should match the parameters we used to retrieve the same values in CEyeSaveDlg.
We then set the position of the Spin control and the Item Text of the text box to these values, so that they are displayed when the dialog pops up.
Now to save the settings, add an overide for the OnOk function( Just double click on the Ok button). We need to save these settings to the Registry using the WriteProfile functions. If you want to save them to a specific INI file instead you can substitute WritePrivateProfile here instead.You'll also have to replace all the GetProfile's with GetPrivateProfiles. For Now we'll just use The functions as below:-
void CSettings::OnBnClickedOk()
{
// TODO: Add your control notification handler code here
UpdateData(TRUE);
AfxGetApp()->WriteProfileString("EyeSaverSettings","DisplayMessage",m_Message);
m_nInterval=m_Spin.GetPos();
AfxGetApp()->WriteProfileInt("EyeSaverSettings","Interval",m_nInterval);
OnOK();
}
Thats it for the CSettings class.
All thats left to do is call CSettings when the user clicks on the Settings menu item. If you remember we had already added a blank function called DisplaySettings for this.
Add a #include "Settings.h" line to the top of EyeSaveDlg.cpp and then add the Display settings function as below.
void CEyeSaveDlg::DisplaySettings()
{
// TODO: Add your command handler code here
KillTimer(m_Timer);
CSettings dlg;
if(dlg.DoModal() == IDOK)
{
m_DisplayMessage =dlg.m_Message;
m_DelaySecs=dlg.m_nInterval*60*1000;
}
m_Timer=SetTimer(1, m_DelaySecs, 0);
}
All we do here s show the settings dialog, then reset our member variables to the values entered there. Also we kill the time before we do this as we don't want a reminder message to popup while the settings dialog is being displayed.
Go ahead and give this application a try.
Labels: C++, VC++